Your cart
There are no more items in your cart
TECHNICAL MANUAL
ESTHETIC RECONSTRUCTION SYSTEM OF HAND NAILS
Preparation
Never do a manicure just before a rebuild.
We must educate the customer to come 2-3 days before for a manicure preparation because the products used, too oily, could limit the length of your work; in extreme cases we may have it soon after.
Good preparation will be essential for the success of the reconstruction.
Manicure: preparation
1)disinfect the hands of you and your.
2)Push the cuticles with an orange stick.
3)Sprinkle the cuticles withoil Skyn Away Penand leave.
4)Meanwhile trim the nailfile 180 stiff.
5)Remove loose cuticles.
6)With the limaShiny3 Face, black side, more abrasive, make vertical and horizontal motions to clean the oxidation of the nail.
7)Clean with a dry pads.
8)Put one drop ofNail Oilon all nails andfile Shiny3 Face, white side, make vertical and horizontal movements with some pressure so as to penetrate the oil.
9)Remove the excess with a dry Pads.
10)With the limaShiny3 Face, grey side, make horizontal movements with some pressure so as to perfectly Nail Polish.
The Three-Phase Product
The classic modeling material is the three-phase system. This system meets all requirements of nail modeling with a perfectly targeted material consisting of a gel, a gel adhesion by modeling, and a sealant gel.
This system supports both basic extensions with the tip that the most advanced with the technique of pits.
Step1-membership-LINKupthis slightly viscous, gel due to its thin consistency, guarantees excellent adherence to the fibrous structure of the natural nail and the subsequent shaping gel.
Phase2-modelling-MODELGELthanks to its stability designed on the basis of physical characteristics of this modelling gel nails can be applied and adapted perfectly.
Stage3-seal-FINISHcover gel specifically designed to impart hardness and gloss to the surface ensuring a long lasting seal.
This is a perfect system for adherence, constructive power and surface sealant, suitable for all uses in modelling.
THREE-PHASE:GEL characteristics and working technique
The gels-phase system MODELING Professional Karisma Nails are suitable for all types of nail shaping:
-Aspect ratio with tips
-Lengthening with maps
-Maintenance (refill) in structures of long nails or who need stability.
The exclusive gel in this line have the particularitity, thanks to their new wording, to beself-levelling.
Their unique/squatting, compared to most famous lines are:
- a strong structure and at the same time very elastic
- they are easy to apply and require a lower usage of gel (approximately 30% less)
- they don't need so strong filings resulting product, saving time and dust
- the end result is very natural, without excessive thickness, no yellowing, and with an excellent grip and stability over time.
The steps listed here will be the compulsory phase to do every time you go to work on your hands.
The five basic steps
1)disinfect your hands and those of the customer withPierrel Ready, then wear latex gloves and mask
2)Push the cuticles with an orange stick
3)Shorten the natural nailfile 180 Stiff
4)Dulling the nail with the fileBufferblockandlima to cylinder
5)Remove excess dust using the brushPowder Brush
French System
The French is an important refinement in the nail that covers the distal margin and is usually white in color. Its shape should be defined according to the ideal of "smile" natural nail and the gels used are of medium consistency and in various colors, mostly white, natural white and bright white.
The Tip System
The Tip is a synthetic material, resistant and flexible, which is applied with a surgical-type glue on the natural nail to allow stretching of the nail itself.
The tip are of different shapes, each appropriate to a natural nail, and should be chosen according to the convexity and the shape of the nail itself. The width should not be less than them but must cover the nail from wall to wall. Should be positioned approximately 1/3 of nail length or up to half if necessary. If the tip does not adhere perfectly to the nail you can easily get unstuck due to a normal collision.
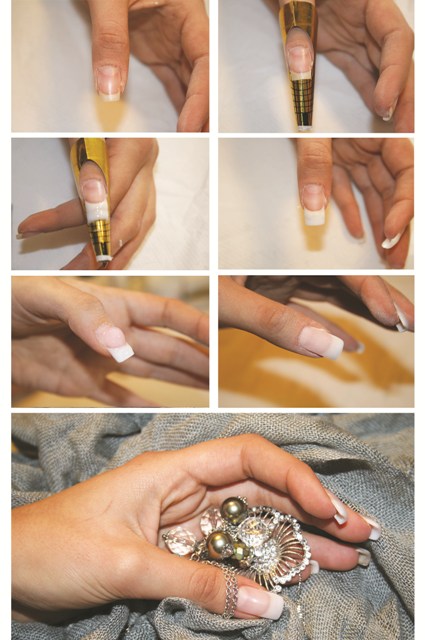
Working Technique:Stretching with Tip
1)five basic steps
2)choose the most appropriate tip if necessary shorten the surface with the lima 100 Flexy
3)distribute a drop ofRapid Glueover the entire surface of the Tip using the spout, lay with an even pressure the Tip on the nail to make coincide the inside edge of the tip with nail freeboard and let out all the air so as not to create bubbles
4)shorten the tip with theTip Cutter
5)file with the file180 Flexibleto remove the step between the nail and tip and give the desired shape to the tip, dulling theBufferblock
6)sprinkle well with thePowder Brush
7)Spread with thebrush Flat Brusha thin layer ofLINKUPover the fingernail including tip – 2 minutes lamp
8)With theNail Spottake a littlegel FRENCHand create your smile keeping regular corners – 2 minutes lamp
9)Spread a generous layer ofMODELGELwith the brushTip Brushand give a good curve C by a vertical movement from the array to the tip without overpowering the cuticles. Fix any dips – 2 minutes lamp
10)With thestiff 180give the right shape at the tip and side, with the limaboomerang 100give the proper form C; finish then the entire surface withBufferblock
11)Sprinkle well withPowder Brush
12)With thebrush Tongue Brushspread across the nail a layer ofFINISHfrom the array to the tip, taking care not to touch the cuticles. Seal the sides and the tip itself – 2 minutes lamp
13)Remove with a pad soaked inCleanerscattering layer
14)Put a few drops ofNail Oilaround the cuticles and massage well
15)Remove the excess with a dry pad rubbing the fingernail
16)Finish as you, massaging the hands of customercreamwith herbs K-Hands
Tip removal:
To operate in case of incorrect application of Tip or creating air bubbles.
1)shorten the tip with Tip Cutter
2)dissolve the Tip with the specific solvent Loose for a few minutes
3)remove it with a Pad
4)Matt finishing nail and again apply another Tip
Attention: use moderately solvent because it tends to dehydrate the nail plate.
The System Of Shapes
When the shapes are best?
It is often difficult to find a suitable tip for a nail bed too wide or flat, forcing it means risking it soon jumps because of so-called "memory" of the tip itself. In other cases there is opposite to almost completely mordicchiate nails, nail beds with edges, an unusual customer adhesives for tip, weak or damaged nails too sensitive to filing.
With the technique of rolling papers (or machine) you can enter perfectly into the slots in the base of the nail and to adapt to any kind of reconstruction nail bed without creating points of tension under the modeling and then only after switching to filing. Shaped nails with templates are processed without glue and this eliminates the risk of hypersensitivity and posting at the points of attack caused by the penetration of water.
With this technique and use of modelling very elastic gel it may face in the best way the different conditions of natural nails.
The extension system of the natural nail Freehand is based on the use of maps and a more gelatinous shaping gel of natural or white quality mirrors:White Extend.
Working Technique:Stretching with the shapes
1)five basic steps
2)Spread with thebrush Flat Brusha thin layer ofLINKUPover the natural nail – 2 minutes lamp
3)Apply the pit by sliding the attack under the freeboard of the natural nail. Be very careful not to create steps between the pit and the nail.
4)With theNail SpotapplyWhite Streand freeboard from descending on the map to the desired length. Attach well to the tip and sides of the natural nail – 2 minutes lamp
5)Remove the map by closing on the tip and then lifting it from the top
6)With thestiff 180give the right shape at the tip and side
7)Spread a generous layer ofMODELGELwith the brushTip Brushover the entire nail and give a good built the curve C by making a vertical movement from the array to the tip without overpowering the cuticles. Fix any dips – 2 minutes lamp
8)Remove with a pad soaked inCleanerscattering layer
9)With thestiff 180give the right shape at the tip and side, with the limaboomerang 100give the proper form C; finish then the entire surface withBufferblock
10)Sprinkle well withPowder Brush
11)With thebrush Tongue Brushspread across the nail a layer ofFINISHfrom the array to the tip, taking care not to touch the cuticles. Seal the sides and the tip itself – 2 minutes lamp
12)Remove with a pad soaked inCleanerscattering layer
13)Put a few drops ofNail Oilaround the cuticles and massage well
14)Remove the excess with a dry pad rubbing the fingernail
15)Finish as you, massaging the hands of customercreamwith herbs K-Hands
Refill Technique
The Refill (or Touch) is an important step to finishing and maintenance cover labour or elongation of the natural nail. Only by correctly this stage the customer can long remain satisfied with his hands.
Only during the refill can realize any problems caused by an incorrect application of the gel. You can find heaves of resins from the nail bed or fractures of the nail itself. It is important, in these cases, check that the nail is not too stressed, and that a bankruptcy filing or an inappropriate application of the materials do not damage the natural nail.
To allow a timely evaluation and effective correction do not prolong the first appointment beyond the normal individual growth of the nail and then determine the ideal frequency of subsequent refill.
Normally you set appointments every 3-4 weeks depending on the physiological growth of individual reviews.
Working Technique:Refill
After approximately 3 weeks from 1° work the nail grew up making visible the step between the natural and the coating:
1)Remove any glaze present withRemover, disinfect and clean the nail
2)disinfect your hands and those of the customer withPierrel Ready, then wear latex gloves and mask
3)Push the cuticles with an orange stick
4)Grind the nailfile 100 Flexibleto shorten it according to the desired length. In this curve C fasela created in the first appointment will appear moved forward and the tip of the nail will be thicker
5)Cut the curve C and the tip with the lima100 Flexiblefor thinning them and then dulling the entire surface withBufferblock
6)Sprinkle well withPowder Brush
7)With nail art brush toapply a thin layer ofPRE-REFILLon the natural nail and air-dry (in case of oily nail use the strong links and dry lamp)
8)With the brushTip Brushspread a thin layer of gelphase FILL-ups– 2 minutes lamp
9)Recreate the smile where necessary with theFrenchright color – 2 minutes lamp
10)With the brushTip Brushspread a layer of gelphase FILLINGEL (or EASYGEL or FIRMGEL)and shape the nail back and side sectors – 2 minutes lamp
11)Remove with a pad soaked inCleanerscattering layer
12)File Boomerang 100give the proper form C; finish then the entire surface withBufferblock
13)Sprinkle well withPowder Brush
14)With thebrush Tongue Brushspread across the nail a thin layer ofFILLINGEL (or FIRMGEL or EASYGEL) from the array to the tip, taking care not to touch the cuticles. Seal the sides and the tip itself – 2 minutes lamp
15)Remove with a pad soaked inCleanerscattering layer
16)Put a few drops ofNail Oilaround the cuticles and massage well
17)Remove the excess with a dry pad rubbing the fingernail
18)Finish as you, massaging the hands of customercreamwith herbs K-Hands
Nail removal
Is the premise that the customer shall submit to a reconstruction of the nails must be aware that it is a natural, non-chemical treatment, comparable to that of permanent hair, once decided not to continue the maintenance we suggest to wait for the normal growth of your nails avoiding post-import a forced removal of material by aggressive substances.
Always best to leave a thin layer of gel to avoid damaging the natural nail surface and then advise the customer to use at home reinforcing products and sealants for natural nails.
Procedure in case of removal:
1)cut the tip of the artificial nails with the lima80 Rectangularup to bring them to the same length as those natural, finish with the lima180 Flexible.
2)File with the same files formerly used the curve C and most of the thickness of artificial nails leaving a thin layer, finish the work with theBufferblock
3)Sprinkle well withPowder Brush
4)Polish the nails with lima Shiny Face first by 3 black part then by the white
5)ApplyNail Care Penacross the nail and massage to penetrate the product
6)Remove excess with a dry Pad
7)Polish the nails with the gray surface of limaShiny 3 Face
8)Apply one coat ofenamel hardener K-Nailson all nails to protect and strengthen
9)Finish as you, massaging the hands of customercreamwith herbs K-Hands
Procedure in case of new reconstruction:
1) filing much gel thickness by removing only the parties raised by natural nails
10)Smoothen the layer with the remaining Bufferblock
11)Sprinkle well withPowder Brush
12)Proceed to reconstruction
http://www.pserviceweb.com/home/it/manuale-per-la-ricostruzione-in-gel-polimero/14246-m.html